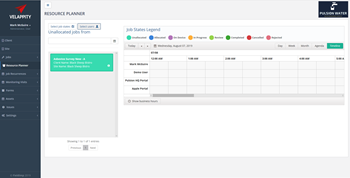
The resource planner in Velappity allows the user to efficiently manage their resources and plan which people will be working on certain jobs at certain times. The user can access the resource planner by clicking on the “Resource Planner” heading.
Once the user has clicked the “Resource Planner” heading, the following page should be displayed:
On this page, the user will be able to select users to show/hide on the page by clicking on the “Select Users” button to get a dropdown menu of all the users on your subscription that can be viewed:
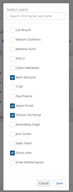
To select a user to view on the page, the checkbox to the left of the user needs to be selected.

To save the changes that have been made to this page, the “Save” button must be clicked.
Jobs with a certain status can also be hidden/shown on the “Resource Planner” page. This can be done by pressing the “Select Job Status” button. Once this has been clicked, a “Select Job States” page will be displayed. The visibility of the various job states can be toggled from here.
When first opening the “Resource planner” page, the user will be shown the “Timeline” view, showing upcoming jobs that have been created using the resource planner. To schedule new jobs the user should select either the “Day”, “Week” or “Month” views depending on their preference, and then drag and drop the jobs to the relevant time slots.
