Monitoring visits are special types of jobs. Monitoring visits can be scheduled to occur regularly on a site (e.g. every week starting 1/1/2018 until 31/12/2020). What makes monitoring visits unlike other Velappity jobs is that the monitoring visit checks the Compliance module to see whether any inspection tests are due on assets.
Inspection regimes on a site start when the first monitoring visit is scheduled.
To display the “Create Monitoring Visits” page, select the “Monitoring Visits > Create” menu. This page has two separate sections, “Details” and “Recurrence Patterns”.
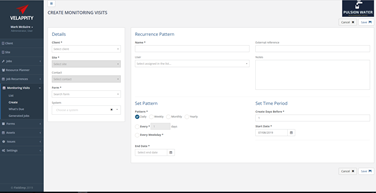
To fill out the “Details” section, the user must select the “Client”, “Site” and “Form” field at least. The “System” field is a dropdown menu of all of the systems that are on the Velappity system e.g. Cooling Tower. The user should choose the system that is applicable to this monitoring visit. If the “System” field is left blank then the monitoring visit will cover all systems on the site.
The “Client” field is a dropdown menu of all the clients on the system, so the user should select the client that this monitoring visit is applicable to. The “Site” field is a dropdown menu of all the sites that are on the system that the user has entered previously. The user should select the site that this monitoring visit is applicable to. The “Contact” field is the contact that is situated at the site, this is a dropdown menu and will depend on what site the user previously selected. The “Form” field is a dropdown menu of all the forms in the system, the user should select the form which is applicable to this monitoring visit.
To fill out the “Recurrence Pattern” section, the user must fill in at least the “Name” field and the “Set pattern” and “Set Time Period” sections. The “Name” field is the name that the user wants to give to the monitoring visit e.g. “Weekly Fire Door Check”. The “External Reference” field is a unique string of letters and/or numbers that uniquely identifies the specific monitoring visit recurrence pattern. This reference is created by the user.
The “User” field is a dropdown menu of all the users on the system e.g. surveyor, this field should be set to whichever user should be carrying out these monitoring visits. If left blank then the user can be assigned when the monitoring visit is assigned.
The “Notes” field is a space where the user can enter any comments on the monitoring visits for the user (e.g. surveyor). The “Pattern” label is used to outline how often the monitoring visit will happen. To set up the pattern, the user must first click on one of the checkboxes from the tab of checkboxes just below the pattern label:
![]()
The daily checkbox is for monitoring visits that need to occur every couple of days, when the daily checkbox has been activated, two new checkboxes will appear below the tab of checkboxes:
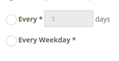
To select a set number of days that are between each monitoring visit, the user must click on the checkbox entitled ‘Every XXX days’. At this point, the user is able to change the number of days between monitoring visits through the textbox. Otherwise, if the user wishes to set each monitoring visit to being on every weekday, the user can click on the checkbox to the left of the “Every Weekday” text.
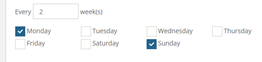
If the monitoring visit is weekly, the user can click on the “Weekly” checkbox in the “Pattern” tab.
![]()
This will then bring up a section, in which the user can enter how many weeks are between each monitoring visit and what day/days of the week the monitoring visit will be on.
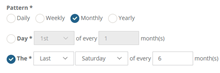
If the monitoring visit is monthly or every couple of months, the user should click on the “Monthly” checkbox in the “Pattern” tab.
![]()
This will bring present the user with two checkboxes below the “Pattern” tab, these are used to differentiate between monitoring visit frequencies
![]()
The user should use the top checkbox if the frequency of the monitoring visit is a certain date on every month, for example, the 15th of every month. Whereas, the user should use the bottom checkbox if the user wishes to set the frequency of the monitoring visit to be on a certain day of that month, for example the 2nd Friday of every month.
The “End Date” field is the date that the user would like the monitoring visits to stop being carried out, for example the user could set up a weekly monitoring visit every Tuesday. However, these weekly monitoring visits could be set up to finish on the 30th August. This field will bring a calendar up when the user clicks on the field, then the user is able to choose a date when the monitoring visits will end. The “Create Days Before” field outlines the number of days before the day that the job should be completed that the job is created for the monitoring visit. The “Start Date” field is the date that the monitoring visits will begin and is the date that applies to some aspects of the “Set Pattern” section as the frequency starts from the starting date. Once the user is happy that all the information is correct, the user should then click on the “Save” button to create this monitoring visit plan.
To determine when monitoring visit jobs are due, the user should click on the “Monitoring Visits > What’s due” menu :
This will then take the user to the “What’s Due” page:

Here, the user is able to see the last time the job was completed and when the next date that the job is due. In this example, the “Monthly Temperature Monitoring” site visit is due on 24/08/2019. On this page, it is possible for the user to view the monitoring visit on its monitoring visit page. This can be done by clicking on the site visit’s link in the “Name” column.
