To log into the Client Portal, the user must first go to the login page.
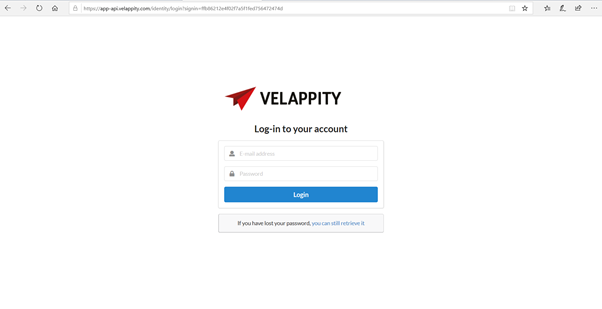
The user should then enter the email address and the password for their Velappity account.
If the user wishes to log out of the Client Portal, the user should click on the “Log Out” button in the menu column. This can be located on the panel to the left of the user’s page:
![]()
Site Management
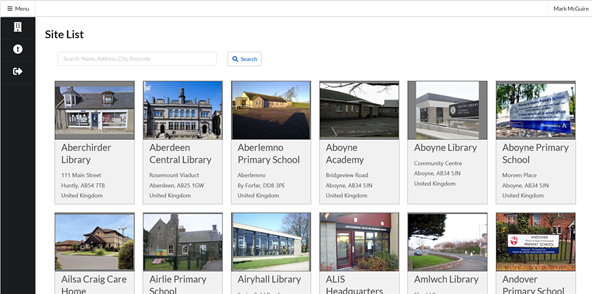
Once logged in, the user will be directed to the “Site List” page. On this page the user will be able to see a list of the sites that they own:
The user can scroll through the sites, with the user also being able to scan through different pages of sites. To change the page that the user is on, the user must scroll down to the bottom of the page that they are on. The user will then see this set of tabs at the bottom of their screen:
![]()
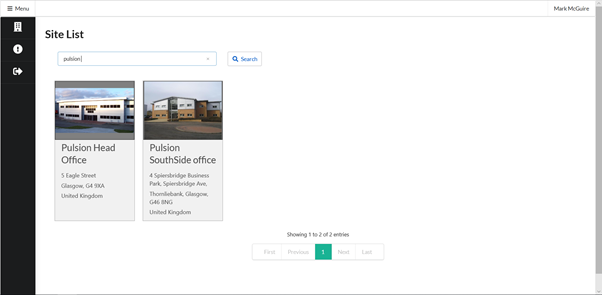
To search for a specific site, the user can use the search bar at the top of every page:
![]()
In here, the user can search for the site name, the site address, the city in which the site is located and the postcode of the site.
To go back to the original site page the user can clear the search bar and press on the “Search” button to the right of the search bar.
Logbook
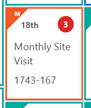
Once the user has found the site that they wish to look at, the user can press on the site and they will be directed to a “Logbook” page for that specific site:
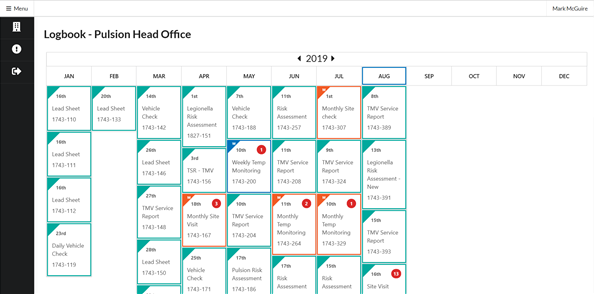
This logbook page shows the user a list of both the one-off jobs and the recurring jobs, ranging from daily to yearly, for this site.
“One-off” jobs are presented within a green box, “Daily” jobs are presented within a purple box as well as having a D at the top left of their box, “Weekly” jobs are presented within a blue box as well as having a W at the top left of their box, “Monthly” jobs are presented within an orange box as well as having a M at the top left of their box and “Yearly” jobs are presented within a pink box as well as having a Y at the top left of their box.
If an issue has occurred in the job, this will be presented at the top right of the box in the form of a number, I.e. if 1 issue has been presented, the number 1 will be presented at the top right of the box. Or if 2 issues have been presented, the number 2 will be presented at the top right of the box.
If a document has been uploaded by the inspector who has carried out the job then the user will be able to view this document by clicking on the corresponding box:
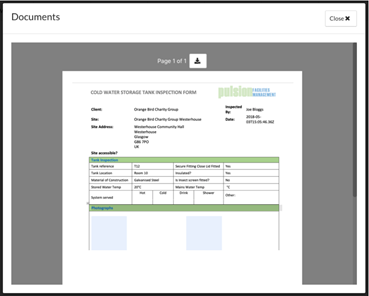
If the user wishes download the results document, the user should press on the “download” button at the top of the “Documents” page.
![]()
Alternatively, if a site visit has been completed by the inspector. Then clicking on the box will allow the user to view the site visit report.
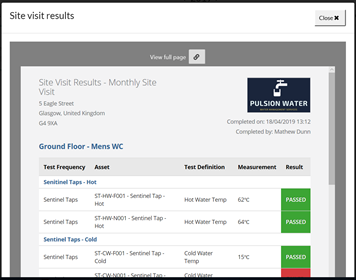
If the user wishes to see the site visit report as a full page, the user should press on the object link at the top of the “Site Visit Results” page marked “View full page”.
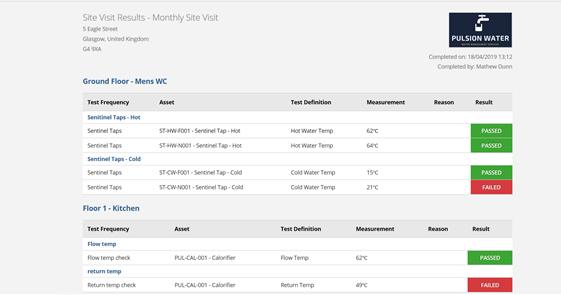
Once the user has clicked on this link, the user will be taken to a new tab in their browser where they will be able to see the document in full screen:
If the user wishes to cycle through years on the “Logbook” page to see job results from previous years or if the user wishes to see jobs that are scheduled to be done in the coming years. The user should scroll to the top of the “Logbook” page. At the top of the page, the user will see the year that they are looking at, as well as buttons to traverse through the years:
![]()
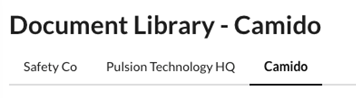
Document Library
The Document Library allows the user to view all the documents they have access to in one place. To get to the document library the user should go to the “Logbook” page for their preferred site and click the “Document Library” button in the top right corner of the page.
The user will then be presented with the document library for this site. To return to the logbook the user should press the “Client Logbook” button in the top right corner of the page.
The documents are separated by whether they are whole organisation documents or specific to a client or site. The user can switch between these options using the tabs at the top of the page.
Beneath these tabs the documents are displayed in categories. Within each category the user can view the documents name, the person who uploaded the document and the date it was added on. The user can also download the document by clicking the “Download” button. Any documents that are not in a category will be displayed in an “Uncategorised” section.
Issues
In order to see issues, the user must be on the “Issues List” page. To get to this page, the user must press on the “Issue” button in the menu section:
![]()
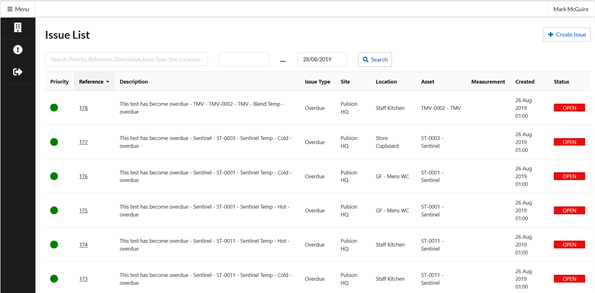
Upon clicking this button, the user will be directed to the “Issue List” page:
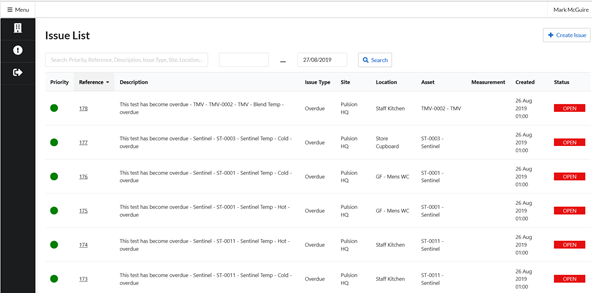
On this page, the user will be able to view the list of issues.
Each line on the issue table displays an issue. Each issue has a “Priority”. A higher priority means that the issue needs to be fixed more urgently. A green circle in the priority column means that the issue is of a low priority, an orange circle in the priority column means that the issue is of a medium priority, a red circle in the priority column means that the issue is of a high priority.
The “Reference” of an issue is a number that is used to uniquely identify the issue, for example there can only be one issue with the number 127. The “Description” of an issue is a brief account of the issue, this usually includes the issue and the asset that the issue applies to.
The “Issue Type” of an issue is a way to classify issues, for example scaling, temperature too low, overdue and location Inaccessible. The “Site” is site at which the asset with the issue is located. The “Location” is the location within the site where the asset with the issue can be found (e.g. Gents Toilet).
The “Asset” is the asset for which there is an issue (e.g. hot water outlet). The “Measurement” only applies to issues for which there is a measurement and is the value of that measurement, for example a temperature measurement could be 23 .
The “Created” column displays the date that the issue was created.
The “Status” of an issue is what stage the issue is at. If the status of an issue is “Open” then the issue is still to be fixed, whereas if an issue is “Closed” then the issue has been fixed. Issues can also be “On Hold”.
To search for a specific issue, the user must scroll to the top of the “Issue List” page to find the search bar:
![]()
In this search bar, the user can enter any information on an issue into the search bar, for example, the user could enter the asset name or the issue type of the issue. The user can also narrow down the dates to search between for when the issues were created. The left field is the date that the start date of the search and the right field is the end date of the search.
If the user wishes to view/edit an issue, the user should click on the “Reference” (the link) for the issue that they wish to view:
![]()
![]()
Once this has been clicked on, the user will be directed to this specific issue’s page:
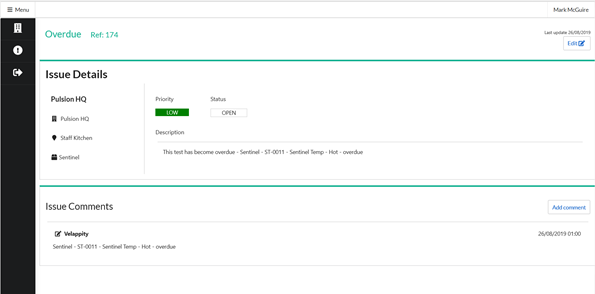
This page contains all of the information that is currently available for this issue, the user is able to edit this data by pressing on the “Edit” button at the top right of the “Issue Details” subsection.
Once clicked, the user will be able to edit the “Priority”, “Status” and “Description” of the issue.
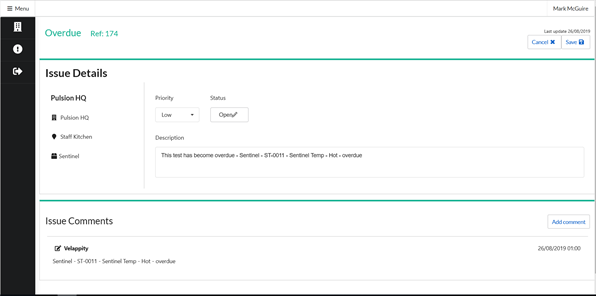
Click the “Save” button to save changes.
It is also possible for the user to add a comment by clicking on the “Add Comment” button.
Creating Issues
To create an issue, go to the “Issue List” page (See the “Issues” section) and click “Create Issue”.
On creation of an issue the “Issue Type” must first be selected. The user should select the most appropriate issue type to categorise the issue.
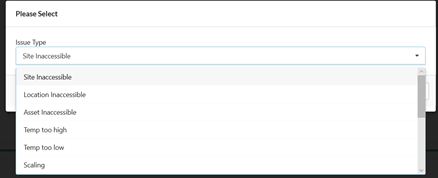
After clicking the “Submit” button, the “Issue Details” page will be shown.
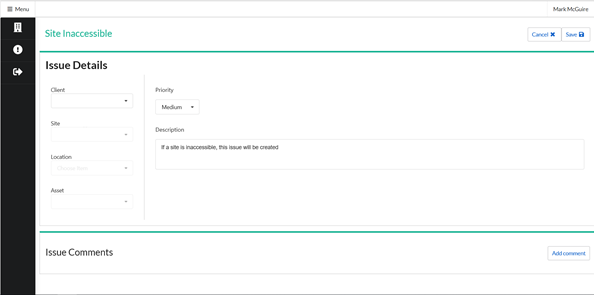
The user can fill in details of the issue in the “Issue Details” page. To add a comment, click on the “Add Comment” button in the top right “Issue Comments” subsection.
Clicking “Save” will save the issue.